Setting up a two-column table is easy! But there are some things you want to think about before creating a table.
Page Margins
When you first create your table, Word assumes that you want the table to fill the width of your page. It’s easier, then, to be sure your document’s margins are set up the way you want the document to be printed. If you forget to do that, or change your margins later and want to change the width of your table’s columns, there will be another lesson showing how to do that.
Paragraph Styles
If you’re using Paragraph Styles (a built-in function in Word that sets fonts and paragraph settings), then you’ll most likely want to be sure you’re using the built-in “Normal” style for the columns in your table. That way, you won’t have any extra space or weird settings in the columns of your table, and you can add them where you want to.
Numbered or Bullet Lists
If you’re going to use a numbered list for the text in your table, you’ll want to set those up ahead of time. It takes a little more effort to fix the format after the fact, but it’s not hard to do…it just takes a bit more time after the fact.
Fixed Column Width
When you’re using pictures inside table cells, Word will automatically resize the columns when you add these pictures. This can be frustrating while you’re working on your document, if you already know how much space you want to leave for pictures. You can tell Word not to change the column width as you add pictures instead of having to change the columns after inserting every new picture.
Spacing Around Table Cells
If you’re writing instructions for someone, and you will be using both pictures and text, it’s easier to have Word add the spacing for you between rows, rather than adding it yourself. You don’t need a lot of space between rows; you just need enough so that the pictures or text columns don’t touch the next rows…you need some separation between steps, if that’s what you’re writing.
Checklist—Are You Ready?
- Set page margins
- Use simple paragraph styles inside the table
- Decide how you’re going to use numbered or bullet lists
- Determine the size and width of each of your columns ahead of time. Then set up the table to that these widths are not changed as you add pictures and/or text.
- Set the spacing around your table cells so that you don’t have to think about adding space between rows in your table.
Let’s create a two-column table with the following settings:
- Page margins: Use the Word standard margins of 1 inch for top, bottom, left, and right margins. You may want to use something different.
- Paragraph style: We’ll use the Normal paragraph style for the picture column, and a new style that we’ll create for a numbered list for the text column.
- We’re going to use a numbered list, and assume that we’re going to have more than nine steps…so we’ll need to change the hanging indent settings to make room for the numbers. (See the “Hanging Indents” tutorial on this web page.)
- I find that leaving about 2.5” for pictures works well, so our left column will be 2.5” wide. The rest of the space will be left for the text or instructions on the right column. (The width you use in your document will depend on the margins of your document.)
- It’s good to leave a little space between rows, so I’m going to set up the table to do this.
- Let’s also remove the table borders. This, of course, is optional.
 Go to the Insert menu, and select Table.
A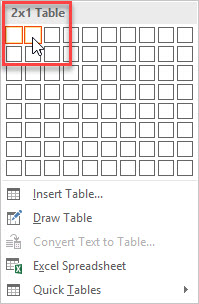 s you hold the mouse down on the arrow at the bottom, a grid is displayed. This is for choosing the number of columns and rows you want to insert in your table.
Since we don’t know the number of rows we’ll need, let’s just select one row of two columns. Hold your mouse over the second box on the first row of the grid, and click that box.
A two-column table is inserted into your document.
You can see it happen here.

Now let’s enter the settings for the table. We decided earlier to standardize the width of the first column to 2.5”, and leave the rest of the width for typing text. We’ll set that up first.
Select the whole table. Just “hover” your pointer (e.g., the mouse) to the left of the first or last row, click the mouse down, and drag across all rows. Since you have only one row, just select that one.
 At the top of the page, you’ll see the ruler, along with some markers. Right now we’re only interested in the column marker. It looks like a box in the middle of the ruler.

Make sure your entire table is still selected. Then, to move the column marker:
- Hold down the <SHIFT> key.
- Move the column marker to the position of 2.5”.
- Let go of the mouse.
Note that, as you drag the pointer with the <SHIFT> key down, the left column gets smaller, and the right column gets larger. If you didn’t hold the shift key down, the entire table gets smaller, not just the column you’re resizing.
You can also view a video of this here.
 We just need now to make sure the column widths don’t change when inserting pictures. To do that, we’ll turn off the option to resize columns automatically. At the same time, we can set the cell margins so that there will always be some space between cells—particularly after each row.
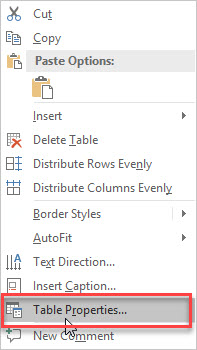
With the table selected, right-mouse-click to the left of the table. You’ll see the menu relating to tables. Select the “Table Properties…> submenu.
 The first tab in the “Table Properties” menu shows the default settings for your table.
Click on the <Options> box at the bottom right of this menu.
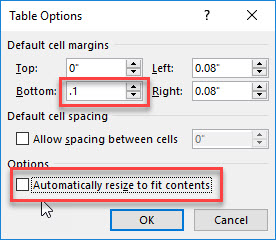
On this menu, change the bottom margin from 0” to something larger. I find that .1” is just enough space to set the rows apart.
Also, be sure to de-select the box that says “Automatically resize to fit contents.” This will ensure that the column sizes stay the same throughout the table.
Watch it here.
 With the table still selected (or re-select the entire table if it isn’t selected), go to the “Home” menu. Look for the border selection box. It looks like this.

Select the “No Border” option to turn off the lines around the table cells.
Finished!
